


By late summer/early fall many daylilies have finished blooming, and the garden is beginning to look less than glamorous, populated with rather unattractive bare scapes (flower stalks or stems) in various stages of browning up. In keeping one's daylily beds looking pristine, many gardeners routinely cut back their daylilies' scapes once the daylily has finished blooming. This is perfectly okay to do. But, before you hack off that scape, you might want to check it closely for proliferations. A proliferation is a new shoot that may (or may not) form on the daylily scape. This new daylily shoot will sometimes already have small roots growing from it. If so, you may want to root this proliferation in a pot and keep it in a sunny window for the winter before transplanting it back into the garden come spring. This proliferation will be an identical twin to the parent plant. Just another way to increase the number of your favorite daylilies!
Pictured here is a proliferation growing off one of the scapes on a daylily in our gardens:
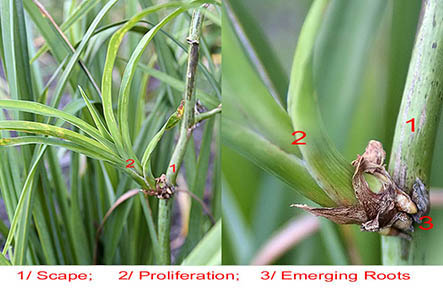
Note the small roots (3) emerging from this proliferation. Since the scape is still green from the plant up to the proliferation, we will leave this in place for now so the mother plan can continue to nourish it, and it can continue to grow longer roots before we harvest it.
The above images were taken a couple of weeks previous. Now, the daylily scapes have started to brown up, and we have begun to harvest the proliferations. This next picture shows one of our "harvested" daylily proliferations:
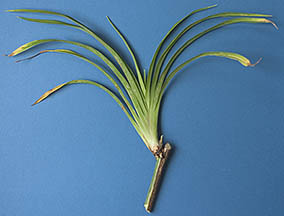
Note that we have cut this daylily scape immediately above the base of the proliferation and about two inches below it. The purpose of leaving the couple of inches below the base of the scape is to provide stability to the new plant when potting it up. Leave this part of the scape on and bury it right in the soil; make sure that the proliferation itself is buried in the soil up to the crown (the point at which the roots meet the base of the leaves).
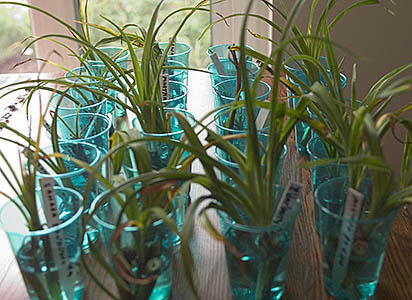
One could pot up a scape such as this immediately after harvesting it; we prefer to place them in a plastic cup, filled with water just up to the newly emerging roots, and leave them near a sunny window to allow the roots to grow even more prior to potting. To hasten root growth even more, you can use a very dilute fertilizer mixture in place of plain water.
Here is one day’s harvest of daylily proliferations along with their identity tags so we know "who's who" when it comes time to plant them.
And there you have it: a few minutes time, a few simple steps, and you've increased your stock of beautiful daylilies. Alternatively, these new daylilies could make great gifts to your fellow "green thumbers."
Next Article - Is that Daylily Evergreen?
Back to - Daylily Article Index
For Reference - Glossary of Daylily Terms
| Home Page | Our Daylilies | Daylily Cultivation Article Index |
| Information Center | Site Map | Offsite Links |
Internet Explorer 5+
Mozilla Firefox 2+
(You can download either of the browsers listed above by clicking on their name link)
